毕设准备
学习之前的准备
项目使用的技术栈
后端:Java、Springboot、MyBatis 前端:Vue、Element-UI、HTML、CSS、Javascript 数据库:MySQL
电脑里需要准备的环境
后端运行环境:JDK 8 前端运行环境:nodejs 代码编写软件:IDEA 数据库:MySQL 5.7 或者 8 数据库可视化:navicat 文档编写软件:typora、word、WPS(非必要) 接口调试工具:postman(非必要)
Vue 框架的快速搭建以及项目工程的讲解
Vue工程的创建
安装vue/cli官方文档:https://cli.vuejs.org/zh/guide/installation.html
创建你要存放Vue工程的文件夹
在文件夹的路径里,输入cmd打开命令行
创建Vue工程
- 安装淘宝镜像(会让你安装Vue的速度加快):npm config set registry https://registry.npm.taobao.org
- 安装vue命令:
npm install -g @vue/cli
出现版本号,说明安装成功: 
- 通过vue命令来创建一个Vue工程:
vue create vue
如果显示:“'vue' 不是内部或外部命令,也不是可运行的程序”,说明环境变量没有配置,需要配置一下环境变量,可以参考这个帖子:https://blog.csdn.net/weixin_44950987/article/details/129284446 配置好环境变量后,关闭cmd,重新进入执行:vue create vue命令即可
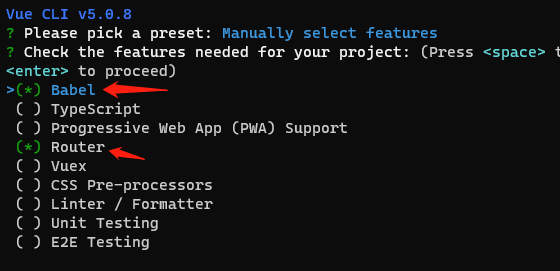
- 设置安装内容
手动选择特性  选择Babel(编译的工具)和 Router(Vue路由),将Linter / Fomatter 取消掉
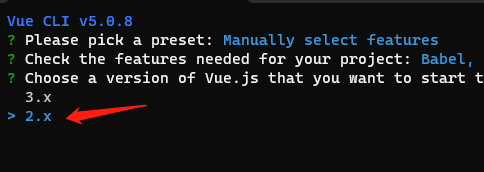
  选择2.x版本
  进行一些配置
  Vue项目工程创建成功
 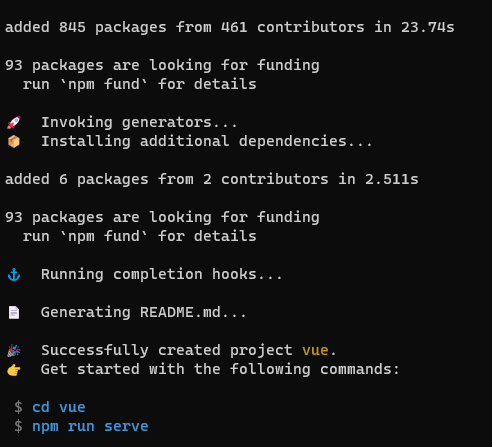 启动Vue工程:
cd vue
npm run serve
启动成功: 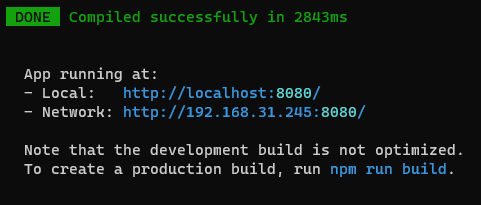
Vue项目工程的介绍
public:放静态文件的地方,比如html、静态图标等等 src:项目的源码目录 src.assets:可以放一些logo、图片、自定义样式啥的 src.components:vue组件 src.router:定义路由,每个路由对应一个页面 src.views:视图文件 App.vue:所有页面的入口 main.js:所有配置的入口,可以导入项目所需要的包,然后组合在一起 vue.config.js:vue项目里的一些配置,可以配置端口、跨域等等
使用IDEA启动Vue工程
配置: 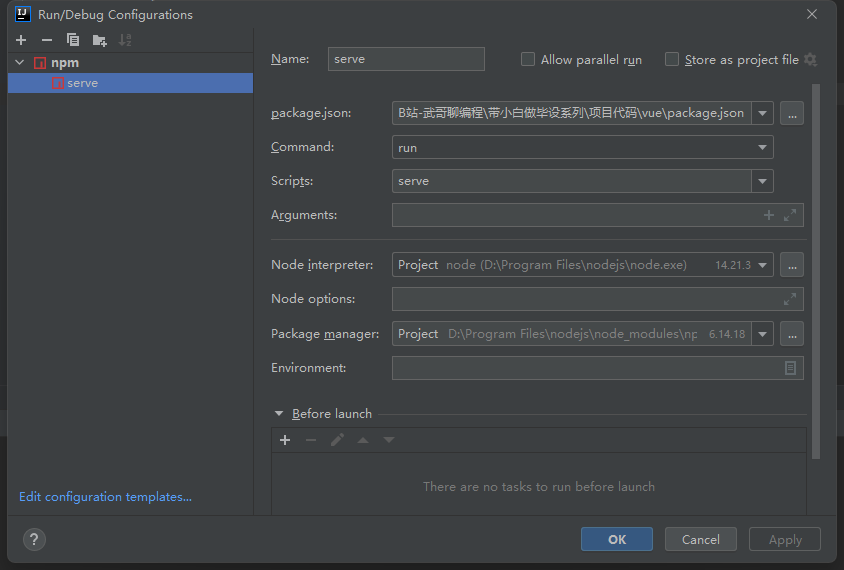
使用Element-UI开发前台页面
Element-UI前端框架:https://element.eleme.cn/#/zh-CN 安装Element-UI:
npm i element-ui -S
在 main.js 里引入Element-UI:
import ElementUI from 'element-ui';
import 'element-ui/lib/theme-chalk/index.css';

Vue.use(ElementUI);
把官网给我们创建好的vue工程清干净 App.vue
<template>
  <div id="app">
    <router-view/>
  </div>
</template>
HomeView.vue
<template>
  <div>
  </div>
</template>

<script>

export default {
  name: 'HomeView',
}
</script>
HomeView.vue中写一个button按钮 el-button:https://element.eleme.cn/#/zh-CN/component/button
<el-button type="primary">按钮</el-button>
清除控件自带的默认样式 global.css
body {
    margin: 0;
    padding: 0;
    overflow: hidden;
}
/*把所有的元素变成盒状模型*/
* {
    /*外边距不会额外占用1px的像素*/
    box-sizing: border-box;
}
在main.js里引入global.css
import '@/assets/global.css'
使用Vue快速搭建一个管理系统的页面框架和数据渲染
在入口文件 App.vue 里对页面进行布局
页面布局
el-container / el-header / el-aside / el-main:https://element.eleme.cn/#/zh-CN/component/container
<el-container>
  <el-header style="background-color: #4c535a">

  </el-header>
</el-container>

<el-container>
  <el-aside style="overflow: hidden; min-height: 100vh; background-color: #545c64; width: 250px">

  </el-aside>
  <el-main>

  </el-main>
</el-container>
顶部栏 header
<el-header style="background-color: #687179">
  <img src="@/assets/logo.png" alt="" style="width: 40px; position: relative; top: 10px;">
  <span style="font-size: 20px; margin-left: 15px; color: white">手拉手带小白做毕设</span>
</el-header>
侧边栏 aside
el-menu:https://element.eleme.cn/#/zh-CN/component/menu
<el-menu default-active="1" background-color="#545c64" text-color="#fff" active-text-color="#ffd04b">
  <el-menu-item index="1">
    <i class="el-icon-s-home"></i>
    <span slot="title">系统首页</span>
  </el-menu-item>
  <el-submenu index="2">
    <template slot="title">
      <i class="el-icon-location"></i><span>用户管理</span>
    </template>
    <el-menu-item-group>
      <el-menu-item index="2-1">管理员信息</el-menu-item>
      <el-menu-item index="2-2">用户信息</el-menu-item>
    </el-menu-item-group>
  </el-submenu>
  <el-submenu index="3">
    <template slot="title">
      <i class="el-icon-location"></i><span>信息管理</span>
    </template>
    <el-menu-item-group>
      <el-menu-item index="3-1">xxx信息</el-menu-item>
      <el-menu-item index="3-2">yyy信息</el-menu-item>
    </el-menu-item-group>
  </el-submenu>
</el-menu>
去除侧边栏右侧小瑕疵:
<style>
.el-menu{
  border-right: none !important;
}
</style>
主体内容 main
<div style="font-size: 18px">欢迎大家跟着武哥一起学习做毕业设计</div>
<div style="font-size: 18px; color: red; margin: 10px 0">点赞、投币、收藏、好评 + 关注,支持一波</div>
<div style="font-size: 18px">感谢大家</div>
将菜单切换修改成路由的方式
- 在 el-menu 标签里绑定 default-active 为路由的形式
:default-active="$route.path" router
- 然后将 标签里的index属性值设置成对应的路由即可,例如:
<el-menu-item index="/admin">管理员信息</el-menu-item>
- 在 index.js 里添加对应路由配置,路由和具体的组件相对应:
{
  path: '/admin',
  name: 'admin',component: () => import('../views/AdminView.vue')
}
- 创建对应的组件(AdminView.vue),编写组件页面对应的代码即可
主体内容表格展示
接着上一节,我们用AdminView.vue为例,在这个页面上来布局表格内容
- 表格上面:搜索、新增
el-input:https://element.eleme.cn/#/zh-CN/component/input
<div>
  <el-input style="width: 200px; margin-right: 10px" placeholder="请输入内容"></el-input>
  <el-button type="warning">搜索</el-button>
  <el-button type="primary">新增</el-button>
</div>
- 表格体
el-table:https://element.eleme.cn/#/zh-CN/component/table
<div>
  <el-table :data="tableData" style="width: 100%; margin: 15px 0px">
    <el-table-column prop="date" label="日期" width="180"></el-table-column>
    <el-table-column prop="name" label="姓名" width="180"></el-table-column>
    <el-table-column prop="address" label="地址"></el-table-column>
    <el-table-column label="操作">
      <el-button type="primary">编辑</el-button>
      <el-button type="danger">删除</el-button>
    </el-table-column>
  </el-table>
</div>
表格数据内容:
<script>
  export default {
    data() {
      return {
        tableData: [{
          date: '2016-05-02',
          name: '王小虎',
          address: '上海市普陀区金沙江路 1518 弄'
        }, {
          date: '2016-05-04',
          name: '王小虎',
          address: '上海市普陀区金沙江路 1517 弄'
        }, {
          date: '2016-05-01',
          name: '王小虎',
          address: '上海市普陀区金沙江路 1519 弄'
        }, {
          date: '2016-05-03',
          name: '王小虎',
          address: '上海市普陀区金沙江路 1516 弄'
        }]
      }
    }
  }
</script>
- 表格数据分页
el-pagination:https://element.eleme.cn/#/zh-CN/component/pagination
<div class="block">
  <el-pagination
      @size-change="handleSizeChange"
      @current-change="handleCurrentChange"
      :current-page="currentPage4"
      :page-sizes="[10, 20, 30, 40]"
      :page-size="10"
      layout="total, sizes, prev, pager, next, jumper"
      :total="400">
  </el-pagination>
</div>
- 在main.js里统一设置所有element控件的size大小
Vue.use(ElementUI, { size: "small" });
- 表格效果
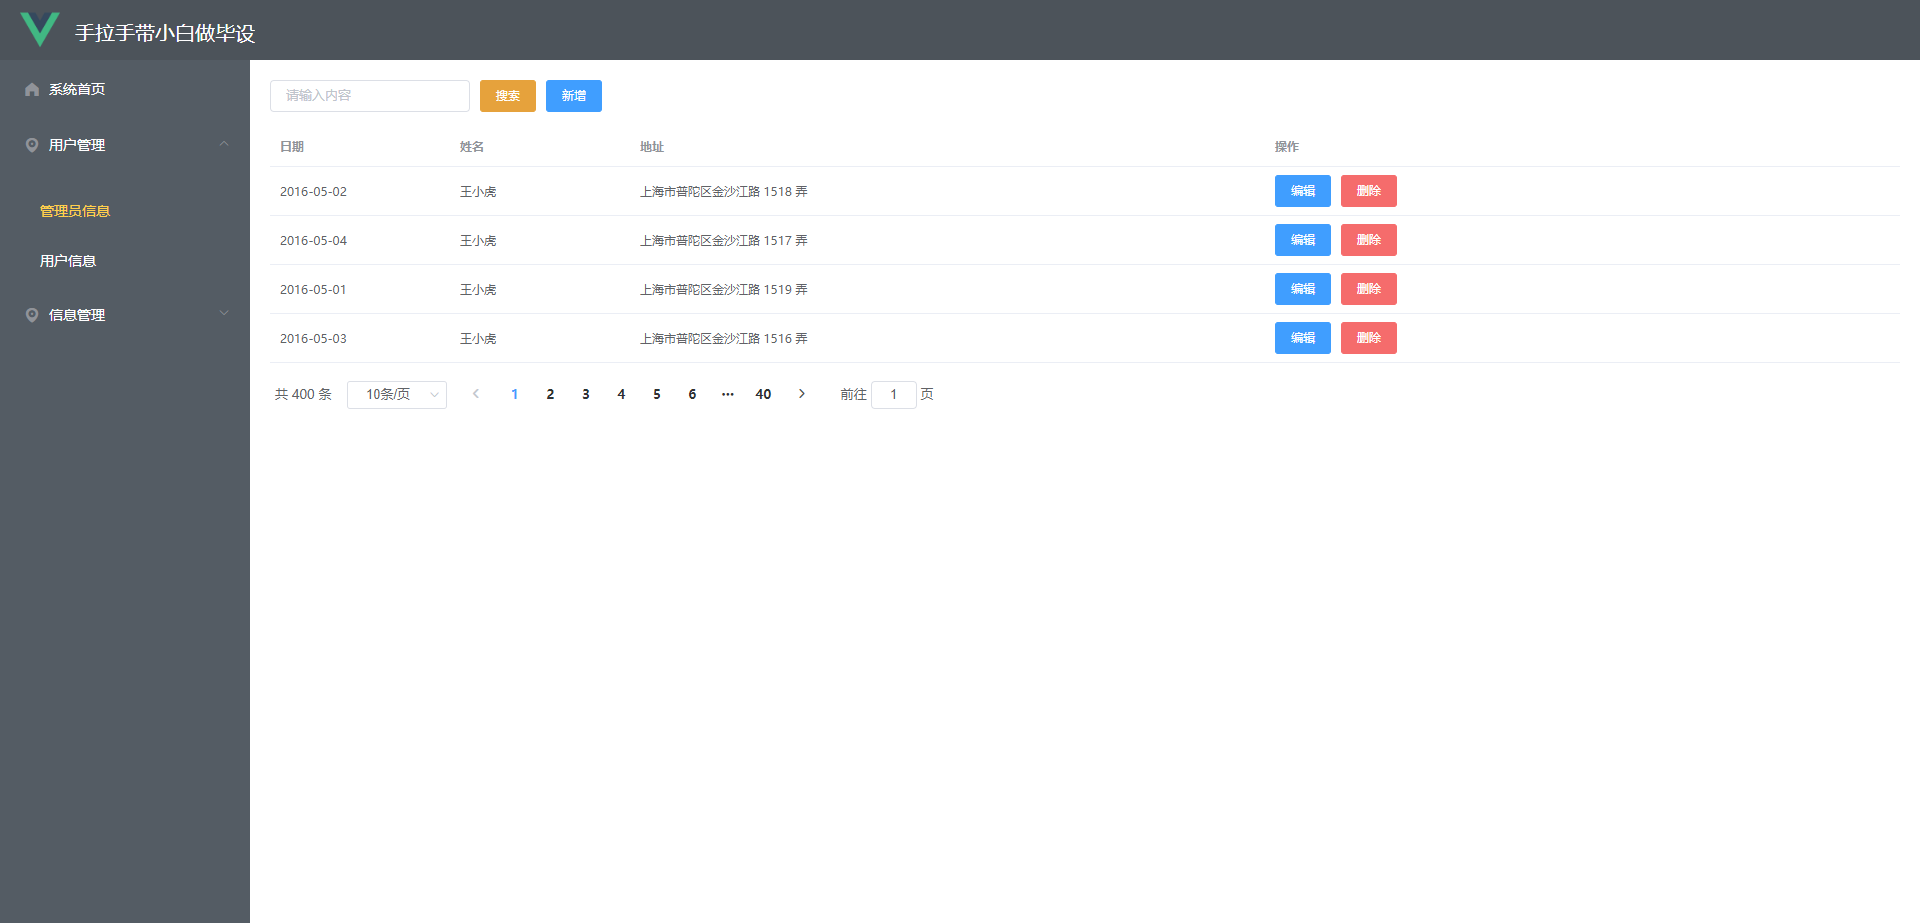
Springboot框架的快速搭建和整合Mybatis
创建一个空的Springboot项目工程
- 在你喜欢的位置,创建一个springboot项目文件夹,命名可以自定义,我们比如使用:springboot
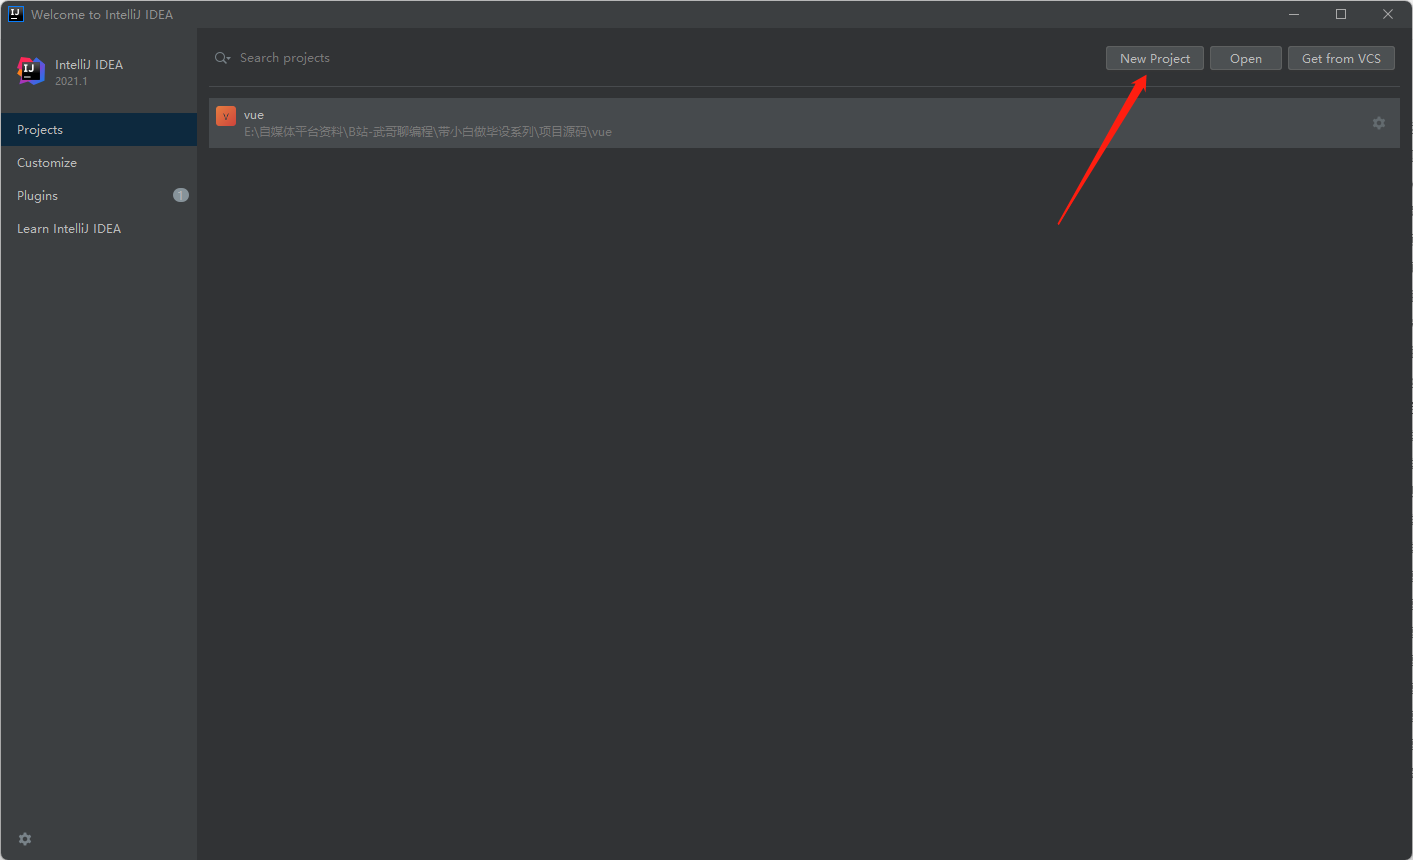
- 启动 IDEA-->New Project
- 选择 Spring Initializr,进行如下配置
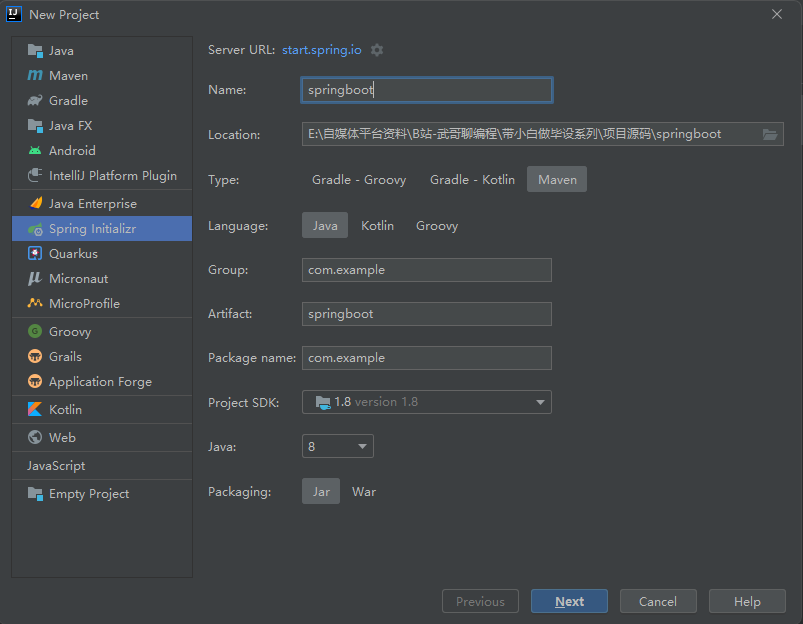 Name:你的项目名称 Location:你的项目对应的路径,最后也是到名称的目录 Type:版本管理类型,我们选择Maven Language:语言,我们选择Java Group/Artifact/Pakage name:我们默认就行,其中Pakage name我们设置成com.example即可(这个可以自定义) Project SDK:这里需要选择你的jdk8安装目录 Java:选择8版本 Packaging:打包方式,选择Jar
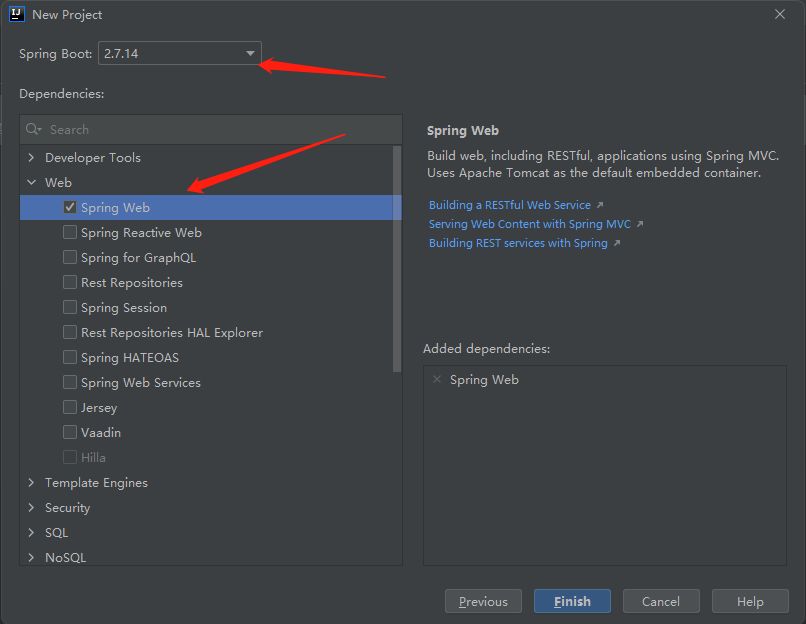
- 选择Springboot版本,并勾选Spring Web即可
- 删除一些不需要的文件
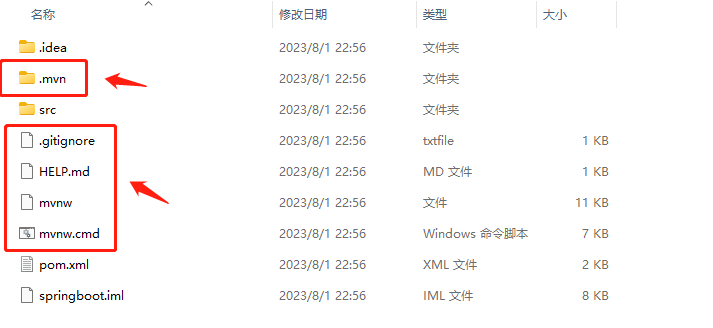

- 将配置文件 application.properties 改成 application.yml(看个人喜好)
这样一个干净的Springboot项目工程就创建好了!!!
项目工程配置一下Maven
打开:File->Settings->maven 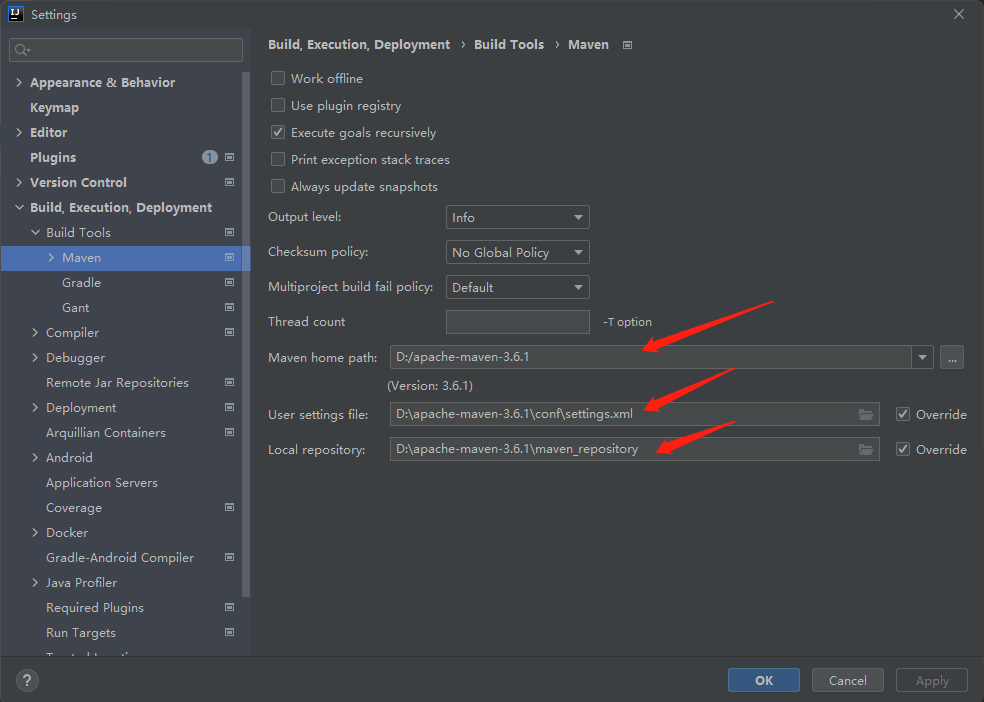
创建常用的包
在com.example下面把每个层的包创建好,用于后续我们在不同的包里创建Java文件,后端我们都是分层的。 controller:后端接口的入口,主要编写各种 xxxController,提供接口给前端调用。 service:后端业务层,主要编写一些后端业务逻辑。controller --> service dao(mapper):后端持久层,主要映射数据库,操作数据库表数据。service --> dao (mapper) entity:实体类,对应数据库表,实体类的属性对应表的字段信息。
编写你的第一个Hello Word
controller是后台接口的入口,这个“接口”跟我们学习Java基础里面的“接口”是有区别,我们这里的接口是针对于前端来说的,前端操作数据会调用后台的接口,前后台交互的入口
@RestController
@RequestMapping("/user")
public class UserController {
    /**
     * controller里的一个方法,它其实就是我们平常说的web项目的一个接口的入口
     * 可以在这个方法上再加上一个url
     * 也可以指定请求方式:GET POST PUT DELETE
     * @return
     */
    @GetMapping("/start")
    public String start() {
        return "欢迎来到武哥的直播间,关注B站:武哥聊编程,一键三连+关注支持一波 !!!";
    }
}
整合MyBatis
- 引入依赖:pom.xml里导入mybatis和数据库mysql的依赖
<dependency>
    <groupId>org.mybatis.spring.boot</groupId>
    <artifactId>mybatis-spring-boot-starter</artifactId>
    <version>1.3.2</version>
</dependency>
<dependency>
    <groupId>mysql</groupId>
    <artifactId>mysql-connector-java</artifactId>
      <version>8.0.13</version>
</dependency>
<dependency>
    <groupId>tk.mybatis</groupId>
    <artifactId>mapper</artifactId>
    <version>4.1.5</version>
</dependency>
- 数据库配置:在application.yml进行数据库配置
# 数据库配置
spring:
  datasource:
    driver-class-name: com.mysql.cj.jdbc.Driver
    username: root   #你本地的数据库用户名
    password: 123456 #你本地的数据库密码
    url: jdbc:mysql://localhost:3306/springboot?useUnicode=true&characterEncoding=utf-8&allowMultiQueries=true&useSSL=false&serverTimezone=GMT%2b8&allowPublicKeyRetrieval=true
- 数据库映射配置:在application.yml配置mybatis和实体类、xml的映射
# 配置mybatis实体和xml映射
mybatis:
  mapper-locations: classpath:mapper/*.xml
  type-aliases-package: com.example.entity
结合MyBatis将数据库打通
- 创建数据库springboot和user表
DROP TABLE IF EXISTS `user`;
CREATE TABLE `user`  (
  `id` int(10) NOT NULL AUTO_INCREMENT COMMENT '主键ID',
  `name` varchar(255) CHARACTER SET utf8mb4 COLLATE utf8mb4_unicode_ci NULL DEFAULT NULL COMMENT '姓名',
  `password` varchar(255) CHARACTER SET utf8mb4 COLLATE utf8mb4_unicode_ci NULL DEFAULT NULL COMMENT '密码',
  `sex` varchar(255) CHARACTER SET utf8mb4 COLLATE utf8mb4_unicode_ci NULL DEFAULT NULL COMMENT '性别',
  `age` int(10) NULL DEFAULT NULL COMMENT '年龄',
  `phone` varchar(255) CHARACTER SET utf8mb4 COLLATE utf8mb4_unicode_ci NULL DEFAULT NULL COMMENT '电话',
  PRIMARY KEY (`id`) USING BTREE
) ENGINE = InnoDB CHARACTER SET = utf8mb4 COLLATE = utf8mb4_unicode_ci COMMENT = '用户信息表' ROW_FORMAT = Dynamic;
初始化一些数据:
INSERT INTO `user` VALUES (1, '张三', '123456', '男', 25, '18888889999');
INSERT INTO `user` VALUES (2, '李四', '123456', '女', 25, '18899998888');
- 创建数据库表对应的实体类User.java
@Table(name = "user")
public class User {

    @Id
    @GeneratedValue(strategy = GenerationType.IDENTITY)
    private Integer id;

    @Column(name = "name")
    private String name;
    @Column(name = "password")
    private String password;
    @Column(name = "sex")
    private String sex;
    @Column(name = "age")
    private Integer age;
    @Column(name = "phone")
    private String phone;
}
- mysql基于注解的映射
UserController中编写:
@RestController
@RequestMapping("/user")
public class UserController {

    @Resource
    private UserService userService;

    @GetMapping("/")
    public List<User> getUser() {
        return userService.getUser();
    }
}
UserService中编写:
@Service
public class UserService {

    @Resource
    private UserDao userDao;

    public List<User> getUser() {
//        return userDao.getUser();
        // 3. 使用引入的包
        return userDao.selectAll();
    }
}
在UserDao.java中编写sql
@Repository
public interface UserDao extends Mapper<User> {

    // 1. 基于注解的方式
    //@Select("select * from user")
    List<User> getUser();
}
重启项目,浏览器输入:http://localhost:8080/start/user 页面出现两条用户信息,表示集成成功。
- mysql基于xml的映射
UserMapper.xml
<?xml version="1.0" encoding="UTF-8"?>
<!DOCTYPE mapper PUBLIC "-//mybatis.org//DTD Mapper 3.0//EN" "http://mybatis.org/dtd/mybatis-3-mapper.dtd">
<mapper namespace="com.example.dao.UserDao">

    <!--2. 基于xml的方式-->
    <select id="getUser" resultType="com.example.entity.User">
        select * from user
    </select>

</mapper>
快速实现增删改查、分页查询、模糊查询功能
封装统一的返回数据结构
public class Result {

    private static final String SUCCESS = "0";
    private static final String ERROR = "-1";

    private String code;
    private String msg;
    private Object data;

    public static Result success() {
        Result result = new Result();
        result.setCode(SUCCESS);
        return result;
    }

    public static Result success(Object data) {
        Result result = new Result();
        result.setCode(SUCCESS);
        result.setData(data);
        return result;
    }

    public static Result error(String msg) {
        Result result = new Result();
        result.setCode(ERROR);
        result.setMsg(msg);
        return result;
    }
}
Vue安装axios,封装request
npm i axios -S
在src目录下,创建一个utils包,用来存放我们自己定义的工具,在utils包里创建一个request.js,来封装request请求
import axios from 'axios'

// 创建一个axios对象出来
const request = axios.create({
    baseURL: 'http://localhost:8080',
    timeout: 5000
})

// request 拦截器
// 可以自请求发送前对请求做一些处理
// 比如统一加token,对请求参数统一加密
request.interceptors.request.use(config => {
    config.headers['Content-Type'] = 'application/json;charset=utf-8';

    // config.headers['token'] = user.token;  // 设置请求头
    return config
}, error => {
    return Promise.reject(error)
});

// response 拦截器
// 可以在接口响应后统一处理结果
request.interceptors.response.use(
    response => {
        // response.data即为后端返回的Result
        let res = response.data;
        // 兼容服务端返回的字符串数据
        if (typeof res === 'string') {
            res = res ? JSON.parse(res) : res
        }
        return res;
    },
    error => {
        console.log('err' + error) // for debug
        return Promise.reject(error)
    }
)


export default request
查询所有管理员信息
查询上节课的用户信息,我们把后台全部改成管理员,然后我们写一个查询请求
export default {
  name: "AdminView",
  data() {
    return {
      tableData: []
    }
  },
  created() {
    this.load();
  },

  methods: {
    load() {
      request.get("/admin").then(res => {
        if (res.code === '0') {
          this.tableData = res.data;
        }
      })
    },
  }
}
解决跨域问题: admin:1 Access to XMLHttpRequest at 'http://localhost:8080/user/getUser' from origin 'http://localhost:8081' has been blocked by CORS policy: No 'Access-Control-Allow-Origin' header is present on the requested resource. 可以在controller上加个注解:@CrossOrigin 也有其他办法,可以百度搜索,有很多解决跨域的问题
按条件查询管理员信息
- AdminView.vue
<el-input v-model="params.name" style="width: 200px" placeholder="请输入姓名"></el-input>
<el-input v-model="params.phone" style="width: 200px; margin-left: 5px" placeholder="请输入电话"></el-input>
<el-button type="warning" style="margin-left: 10px" @click="findBySearch()">查询</el-button>
// data里定义一个params
params: {
  name: '',
  phone: ''
},
// methods里定义一个findBySearch
findBySearch() {
  request.get("/admin/search", {
    params: this.params
  }).then(res => {
    if (res.code === '0') {
      this.tableData = res.data;
    } else {

    }
  })
},
- 在entity包里创建一个实体类接收参数,Params.java
public class Params {
    private String name;
    private String phone;
}
- AdminController.java
@GetMapping("/search")
public Result findBySearch(Params params) {
    List<Admin> list = adminService.findBySearch(params);
    return Result.success(list);
}
- AdminService.java
public List<Admin> findBySearch(Params params) {
    return adminDao.findBySearch(params);
}
- AdminDao.java
List<Admin> findBySearch(@Param("params") Params params);
- AdminMapper.xml
<select id="findBySearch" resultType="com.example.entity.Admin">
    select * from admin
    <where>
        <if test="params != null and params.name != null and params.name != ''">
            and name like concat('%', #{ params.name }, '%')
        </if>
        <if test="params != null and params.phone != null and params.phone != ''">
            and phone like concat('%', #{ params.phone }, '%')
        </if>
    </where>
</select>
分页查询管理员信息
- pom.xml里导入分页插件依赖:
<dependency>
    <groupId>com.github.pagehelper</groupId>
    <artifactId>pagehelper-spring-boot-starter</artifactId>
    <version>1.2.10</version>
</dependency>
- application.yml拷贝好分页配置
pagehelper:
  helper-dialect: mysql
  reasonable: true
  support-methods-arguments: true
  params: count=countSql
- AdminView.vue
<el-button type="warning" @click="reset()">清空</el-button>

<div style="margin-top: 10px">
  <el-pagination
      @size-change="handleSizeChange"
      @current-change="handleCurrentChange"
      :current-page="params.pageNum"
      :page-sizes="[5, 10, 15, 20]"
      :page-size="params.pageSize"
      layout="total, sizes, prev, pager, next"
      :total="total">
  </el-pagination>
</div>
params: {
  name: '',
    phone: '',
    pageNum: 1,
    pageSize: 5
},
total: 0
reset() {
  this.params = {
    pageNum: 1,
    pageSize: 5,
    name: '',
    phone: ''
  }
  this.findBySearch();
},
handleSizeChange(pageSize) {
  this.params.pageSize = pageSize;
  this.findBySearch();
},
handleCurrentChange(pageNum) {
  this.params.pageNum = pageNum;
  this.findBySearch();
},
- AdminController.java
@GetMapping("/search")
public Result findBySearch(Params params) {
    PageInfo<Admin> info = adminService.findBySearch(params);
    return Result.success(info);
}
- AdminService.java
public PageInfo<Admin> findBySearch(Params params) {
    // 开启分页查询
    PageHelper.startPage(params.getPageNum(), params.getPageSize());
    // 接下来的查询会自动按照当前开启的分页设置来查询
    List<Admin> list = adminDao.findBySearch(params);
    return PageInfo.of(list);
}
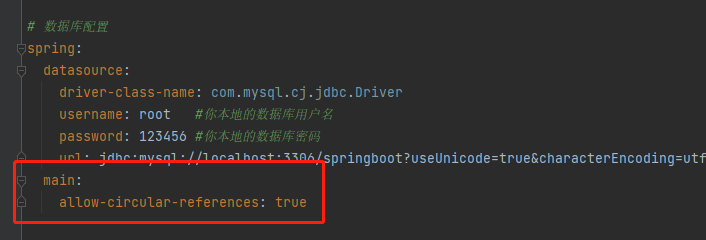
注:如果你启动项目遇到了循环依赖问题:  可以在application.yml里配置一个允许循环依赖:
spring:
    main:
        allow-circular-references: true
新增、编辑管理员信息
el-dialog:https://element.eleme.cn/#/zh-CN/component/dialog
- AdminView.vue
<el-button type="primary" style="margin-left: 10px" @click="add()">新增</el-button>

<el-table-column label="操作">
  <template slot-scope="scope">
    <el-button type="primary" @click="edit(scope.row)">编辑</el-button>
    <el-button type="danger">删除</el-button>
  </template>
</el-table-column>

<div>
  <el-dialog title="请填写信息" :visible.sync="dialogFormVisible" width="30%">
    <el-form :model="form">
      <el-form-item label="姓名" label-width="15%">
        <el-input v-model="form.name" autocomplete="off" style="width: 90%"></el-input>
      </el-form-item>
      <el-form-item label="性别" label-width="15%">
        <el-radio v-model="form.sex" label="男">男</el-radio>
        <el-radio v-model="form.sex" label="女">女</el-radio>
      </el-form-item>
      <el-form-item label="年龄" label-width="15%">
        <el-input v-model="form.age" autocomplete="off" style="width: 90%"></el-input>
      </el-form-item>
      <el-form-item label="电话" label-width="15%">
        <el-input v-model="form.phone" autocomplete="off" style="width: 90%"></el-input>
      </el-form-item>
    </el-form>
    <div slot="footer" class="dialog-footer">
      <el-button @click="dialogFormVisible = false">取 消</el-button>
      <el-button type="primary" @click="submit()">确 定</el-button>
    </div>
  </el-dialog>
</div>
dialogFormVisible: false,
form: {}

add() {
  this.form = {};
  this.dialogFormVisible = true;
},
edit(obj) {
  this.form = obj;
  this.dialogFormVisible = true;
},
submit() {
  request.post("/admin", this.form).then(res => {
    if (res.code === '0') {
      this.$message({
        message: '操作成功',
        type: 'success'
      });
      this.dialogFormVisible = false;
      this.findBySearch();
    } else {
      this.$message({
        message: res.msg,
        type: 'success'
      });
    }
  })
}
- AdminController.java
@PostMapping
public Result save(@RequestBody Admin admin) {
    if (admin.getId() == null) {
        adminService.add(admin);
    } else {
        adminService.update(admin);
    }
    return Result.success();
}
- AdminService.java
public void add(Admin admin) {
    // 1. 用户名一定要有,否则不让新增(后面需要用户名登录)
    if (admin.getName() == null || "".equals(admin.getName())) {
        throw new CustomException("用户名不能为空");
    }
    // 2. 进行重复性判断,同一名字的管理员不允许重复新增:只要根据用户名去数据库查询一下就可以了
    Admin user = adminDao.findByName(admin.getName());
    if (user != null) {
        // 说明已经有了,这里我们就要提示前台不允许新增了
        throw new CustomException("该用户名已存在,请更换用户名");
    }
    // 初始化一个密码
    if (admin.getPassword() == null) {
        admin.setPassword("123456");
    }
    adminDao.insertSelective(admin);
}

public void update(Admin admin) {
    adminDao.updateByPrimaryKeySelective(admin);
}
- AdminDao.java
@Select("select * from admin where name = #{name} limit 1")
Admin findByName(@Param("name") String name);
- 操作后的提示信息
https://element.eleme.cn/#/zh-CN/component/message
删除管理员信息
el-popconfirm:
- AdminView.vue
<el-popconfirm title="确定删除吗?" @confirm="del(scope.row.id)">
  <el-button slot="reference" type="danger" style="margin-left: 5px">删除</el-button>
</el-popconfirm>
del(id) {
  request.delete("/admin/" + id).then(res => {
    if (res.code === '0') {
      this.$message({
        message: '删除成功',
        type: 'success'
      });
      this.findBySearch();
    } else {
      this.$message({
        message: res.msg,
        type: 'success'
      });
    }
  })
}
- AdminController.java
@DeleteMapping("/{id}")
public Result delete(@PathVariable Integer id) {
    adminService.delete(id);
    return Result.success();
}
- AdminService.java
public void delete(Integer id) {
    adminDao.deleteByPrimaryKey(id);
}
快速实现登录、注册功能
创建登录的视图页面
在views里创建一个LoginView.vue,且配置一下路由
<template>
  <div>
    这是登录页面
  </div>
</template>

<script>

export default {
  name: "LOGIN",
  data() {
    return {

    }
  },
  methods: {

  }
}
</script>
import LoginView from '../views/LoginView.vue'
{
  path: '/login',
  name: 'login',
  component: LoginView
},
使用/login路由请求一下登录页面,会发现很奇怪:它不是一个独立的登录页面,而是嵌入在这个后台管理系统框架内部,这明显不是我们想要的。 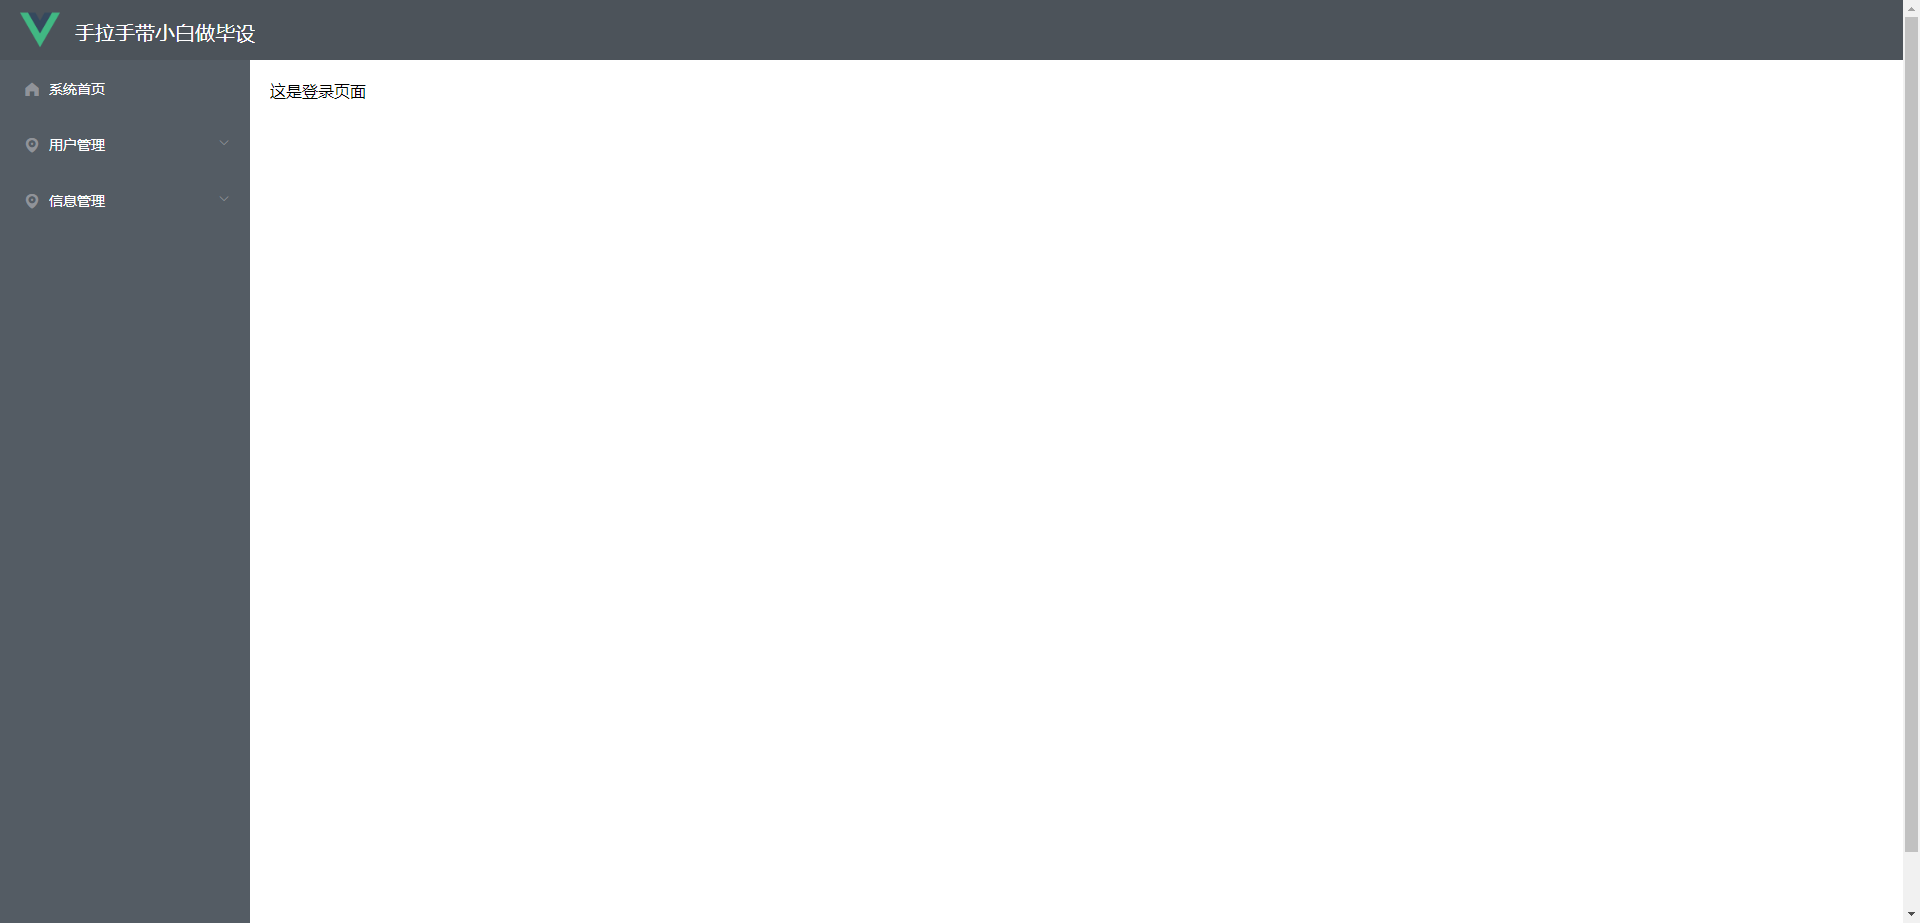
将路由分级,一级路由和二级路由
- 首先我们需要把App.vue里的内容移出去,比如我创建一个Layout.vue文件,把所有内容移到Layout.vue文件里
<template>
  <div>
    <el-container>
      <el-header style="background-color: #4c535a">
        <img src="@/assets/logo.png" alt="" style="width: 40px; position: relative; top: 10px;">
        <span style="font-size: 20px; margin-left: 15px; color: white">手拉手带小白做毕设</span>
      </el-header>
    </el-container>
    <el-container>
      <el-aside style="overflow: hidden; min-height: 100vh; background-color: #545c64; width: 250px">
        <el-menu :default-active="$route.path" router background-color="#545c64" text-color="#fff" active-text-color="#ffd04b">
          <el-menu-item index="/">
            <i class="el-icon-s-home"></i>
            <span slot="title">系统首页</span>
          </el-menu-item>
          <el-submenu index="2">
            <template slot="title">
              <i class="el-icon-location"></i><span>用户管理</span>
            </template>
            <el-menu-item-group>
              <el-menu-item index="/admin">管理员信息</el-menu-item>
              <el-menu-item index="2-2">用户信息</el-menu-item>
            </el-menu-item-group>
          </el-submenu>
          <el-submenu index="3">
            <template slot="title">
              <i class="el-icon-location"></i><span>信息管理</span>
            </template>
            <el-menu-item-group>
              <el-menu-item index="3-1">xxx信息</el-menu-item>
              <el-menu-item index="3-2">yyy信息</el-menu-item>
            </el-menu-item-group>
          </el-submenu>
        </el-menu>
      </el-aside>
      <el-main>
        <router-view/>
      </el-main>
    </el-container>
  </div>
</template>

<script>
export default {
  name: "Layout"
}
</script>

<style>
.el-menu{
  border-right: none !important;
}
</style>
- App.vue文件里,写上
<template>
  <div id="app">
    <router-view />
  </div>
</template>
- 修改路由,把一级路由定义在Layout,然后菜单那些路由,定义在children里,作为子路由,这样的话就可以把login放在一级路由了。
const routes = [
  {
    path: '/login',
    name: 'login',
    component: LoginView
  },
  {
    path: '/',
    name: 'Layout',
    component: Layout,
    children: [ // 子路由
      {
        path: '',
        name: 'home',
        component: HomeView
      },
      {
        path: 'admin',
        name: 'admin',
        component: () => import('../views/AdminView.vue')
      }
    ]
  },

]
登录页面的设计
<div>
  <div style="width: 400px; height: 350px; margin: 150px auto; background-color:rgba(107,149,224,0.5); border-radius: 10px">
    <div style="width: 100%; height: 100px; font-size: 30px; line-height: 100px; text-align: center; color: #4a5ed0">欢迎登录</div>
    <div style="margin-top: 25px; text-align: center; height: 320px;">
      <el-form :model="admin">
        <el-form-item>
          <el-input v-model="admin.name" prefix-icon="el-icon-user" style="width: 80%" placeholder="请输入用户名"></el-input>
        </el-form-item>
        <el-form-item>
          <el-input v-model="admin.password" prefix-icon="el-icon-lock" style="width: 80%" placeholder="请输入密码"></el-input>
        </el-form-item>
        <el-form-item>
          <el-button style="width: 80%; margin-top: 10px" type="primary" @click="login()">登录</el-button>
        </el-form-item>
      </el-form>

    </div>
  </div>
</div>
<script>

import request from "@/utils/request";

export default {
  name: "Login",
  data() {
    return {
      admin: {}
    }
  },
  // 页面加载的时候,做一些事情,在created里面
  created() {
  },
  // 定义一些页面上控件出发的事件调用的方法
  methods: {
    login() {
      request.post("/admin/login", this.admin).then(res => {
        if (res.code === '0') {
          this.$message({
            message: '登录成功',
            type: 'success'
          });
          this.$router.push("/");
        } else {
          this.$message({
            message: res.msg,
            type: 'error'
          });
        }
      })
    }
  }
}
</script>
登录后台逻辑
- AdminController
@PostMapping("/login")
public Result login(@RequestBody Admin admin) {
    Admin loginUser = adminService.login(admin);
    return Result.success(loginUser);
}
- AdminService
public Admin login(Admin admin) {
    // 1. 进行一些非空判断
    if (admin.getName() == null || "".equals(admin.getName())) {
        throw new CustomException("用户名不能为空");
    }
    if (admin.getPassword() == null || "".equals(admin.getPassword())) {
        throw new CustomException("密码不能为空");
    }
    // 2. 从数据库里面根据这个用户名和密码去查询对应的管理员信息,
    Admin user = adminDao.findByNameAndPassword(admin.getName(), admin.getPassword());
    if (user == null) {
        // 如果查出来没有,那说明输入的用户名或者密码有误,提示用户,不允许登录
        throw new CustomException("用户名或密码输入错误");
    }
    // 如果查出来了有,那说明确实有这个管理员,而且输入的用户名和密码都对;
    return user;
}
- AdminDao.java
@Select("select * from admin where name = #{name} and password = #{password} limit 1")
Admin findByNameAndPassword(@Param("name") String name, @Param("password") String password);
异常捕获与自定义异常
- GlobalExceptionHandler
package com.example.exception;

import com.example.common.Result;
import org.slf4j.Logger;
import org.slf4j.LoggerFactory;
import org.springframework.web.bind.annotation.ControllerAdvice;
import org.springframework.web.bind.annotation.ExceptionHandler;
import org.springframework.web.bind.annotation.ResponseBody;

import javax.servlet.http.HttpServletRequest;

@ControllerAdvice(basePackages="com.example.controller")
public class GlobalExceptionHandler {

    private static final Logger log = LoggerFactory.getLogger(GlobalExceptionHandler.class);

    //统一异常处理@ExceptionHandler,主要用于Exception
    @ExceptionHandler(Exception.class)
    @ResponseBody
    public Result error(HttpServletRequest request, Exception e){
        log.error("异常信息:",e);
        return Result.error("系统异常");
    }

    @ExceptionHandler(CustomException.class)
    @ResponseBody
    public Result customError(HttpServletRequest request, CustomException e){
        return Result.error(e.getMsg());
    }
}
- 自定义异常:CustomException
package com.example.exception;

public class CustomException extends RuntimeException {
    private String msg;

    public CustomException(String msg) {
        this.msg = msg;
    }

    public String getMsg() {
        return msg;
    }

    public void setMsg(String msg) {
        this.msg = msg;
    }
}
注册功能的实现
- 注册页面:LoginView.vue
<template>
  <div>
    <div style="width: 400px; height: 350px; margin: 150px auto; background-color:rgba(165,190,234,0.5); border-radius: 10px">
      <div style="width: 100%; height: 100px; font-size: 30px; line-height: 100px; text-align: center; color: #4a5ed0">欢迎注册</div>
      <div style="margin-top: 25px; text-align: center; height: 320px;">
        <el-form :model="admin">
          <el-form-item>
            <el-input v-model="admin.name" prefix-icon="el-icon-user" style="width: 80%" placeholder="请输入用户名"></el-input>
          </el-form-item>
          <el-form-item>
            <el-input v-model="admin.password" prefix-icon="el-icon-lock" style="width: 80%" placeholder="请输入密码"></el-input>
          </el-form-item>
          <el-form-item>
            <el-button style="width: 80%; margin-top: 10px" type="primary" @click="register()">注册</el-button>
          </el-form-item>
        </el-form>

      </div>
    </div>
  </div>
</template>

<script>

import request from "@/utils/request";

export default {
  name: "Register",
  data() {
    return {
      admin: {}
    }
  },
  // 页面加载的时候,做一些事情,在created里面
  created() {
  },
  // 定义一些页面上控件出发的事件调用的方法
  methods: {
    register() {
      request.post("/admin/register", this.admin).then(res => {
        if (res.code === '0') {
          this.$message({
            message: '注册成功',
            type: 'success'
          });
          this.$router.push("/login");
        } else {
          this.$message({
            message: res.msg,
            type: 'error'
          });
        }
      })
    }
  }
}
</script>
- 添加一下路由
import RegisterView from "@/views/RegisterView";

{
  path: '/register',
  name: 'Register',
  component: RegisterView
},
- AdminController.java
@PostMapping("/register")
public Result register(@RequestBody Admin admin) {
    adminService.add(admin);
    return Result.success();
}
使用jwt进行登录鉴权
登录相关功能的优化
- 登录后显示当前登录用户
el-dropdown: https://element.eleme.cn/#/zh-CN/component/dropdown#dropdown-attributes
<el-dropdown style="float: right; height: 60px; line-height: 60px">
  <span class="el-dropdown-link" style="color: white; font-size: 16px">{{ user.name }}<i class="el-icon-arrow-down el-icon--right"></i></span>
  <el-dropdown-menu slot="dropdown">
    <el-dropdown-item>
      <div @click="logout">退出登录</div>
    </el-dropdown-item>
  </el-dropdown-menu>
</el-dropdown>
- 登录成功后,将登录的用户信息存储到前端的localStorage里
localStorage.setItem("user", JSON.stringify(res.data));
- 登录成功后,从localStorage里获取当前的登录用户
data () {
  return {
    user: localStorage.getItem("user") ? JSON.parse(localStorage.getItem("user")) : {},
  }
},
- 退出登录后,清localStorage,跳到登录页
methods: {
  logout() {
    localStorage.removeItem("user");
    this.$router.push("/login");
  }
}
这样安全吗?? 肯定不安全,用户可以跳过登录,直接在浏览器上输入后台的路由地址,即可直接进入系统,访问敏感数据。
前端路由守卫
在路由配置文件index.js里,配上路由守卫
// 路由守卫
router.beforeEach((to ,from, next) => {
  if (to.path ==='/login') {
    next();
  }
  const user = localStorage.getItem("user");
  if (!user && to.path !== '/login') {
    return next("/login");
  }
  next();
})
这样就安全了吗?? 还是不安全,因为前端的数据是不安全的,是可以认为篡改的!就是说,鉴权放在前端,是不安全的。我们的登录鉴权肯定是要放在服务端来完成。
使用jwt在后端进行鉴权
在用户登录后,后台给前台发送一个凭证(token),前台请求的时候需要带上这个凭证(token),才可以访问接口,如果没有凭证或者凭证跟后台创建的不一致,则说明该用户不合法。
- pom.xml
<dependency>
    <groupId>com.auth0</groupId>
    <artifactId>java-jwt</artifactId>
    <version>3.10.3</version>
</dependency>
<dependency>
    <groupId>cn.hutool</groupId>
    <artifactId>hutool-all</artifactId>
    <version>5.3.7</version>
</dependency>
- 给后台接口加上统一的前缀/api,然后我们统一拦截该前缀开头的接口,所以配置一个拦截器
import org.springframework.context.annotation.Configuration;
import org.springframework.web.bind.annotation.RestController;
import org.springframework.web.servlet.config.annotation.PathMatchConfigurer;
import org.springframework.web.servlet.config.annotation.WebMvcConfigurer;

@Configuration
public class WebConfig implements  WebMvcConfigurer {
    @Override
    public void configurePathMatch(PathMatchConfigurer configurer) {
        // 指定controller统一的接口前缀
        configurer.addPathPrefix("/api", clazz -> clazz.isAnnotationPresent(RestController.class));
    }
}
request封装里面,baseUrl也需要加个 /api 前缀
- Jwt配置
JwtTokenUtils.java jwt的规则
import cn.hutool.core.date.DateUtil;
import cn.hutool.core.util.StrUtil;
import com.auth0.jwt.JWT;
import com.auth0.jwt.algorithms.Algorithm;
import com.example.entity.Admin;
import com.example.service.AdminService;
import org.slf4j.Logger;
import org.slf4j.LoggerFactory;
import org.springframework.stereotype.Component;
import org.springframework.web.context.request.RequestContextHolder;
import org.springframework.web.context.request.ServletRequestAttributes;

import javax.annotation.PostConstruct;
import javax.annotation.Resource;
import javax.servlet.http.HttpServletRequest;
import java.util.Date;

@Component
public class JwtTokenUtils {

    private static AdminService staticAdminService;
    private static final Logger log = LoggerFactory.getLogger(JwtTokenUtils.class);

    @Resource
    private AdminService adminService;

    @PostConstruct
    public void setUserService() {
        staticAdminService = adminService;
    }

    /**
     * 生成token
     */
    public static String genToken(String adminId, String sign) {
        return JWT.create().withAudience(adminId) // 将 user id 保存到 token 里面,作为载荷
                .withExpiresAt(DateUtil.offsetHour(new Date(), 2)) // 2小时后token过期
                .sign(Algorithm.HMAC256(sign)); // 以 password 作为 token 的密钥
    }

    /**
     * 获取当前登录的用户信息
     */
    public static Admin getCurrentUser() {
        String token = null;
        try {
            HttpServletRequest request = ((ServletRequestAttributes) RequestContextHolder.getRequestAttributes()).getRequest();
            token = request.getHeader("token");
            if (StrUtil.isBlank(token)) {
                token = request.getParameter("token");
            }
            if (StrUtil.isBlank(token)) {
                log.error("获取当前登录的token失败, token: {}", token);
                return null;
            }
            // 解析token,获取用户的id
            String adminId = JWT.decode(token).getAudience().get(0);
            return staticAdminService.findByById(Integer.valueOf(adminId));
        } catch (Exception e) {
            log.error("获取当前登录的管理员信息失败, token={}", token,  e);
            return null;
        }
    }
}
用户在登录成功后,需要返回一个token给前台
// 生成jwt token给前端
String token = JwtTokenUtils.genToken(user.getId().toString(), user.getPassword());
user.setToken(token);
前台把token获取到,下次请求的时候,带到header里
const user = localStorage.getItem("user");
if (user) {
    config.headers['token'] = JSON.parse(user).token;
}
- 拦截器:JwtInterceptor.java
import cn.hutool.core.util.StrUtil;
import com.auth0.jwt.JWT;
import com.auth0.jwt.JWTVerifier;
import com.auth0.jwt.algorithms.Algorithm;
import com.auth0.jwt.exceptions.JWTVerificationException;
import com.example.entity.Admin;
import com.example.exception.CustomException;
import com.example.service.AdminService;
import org.slf4j.Logger;
import org.slf4j.LoggerFactory;
import org.springframework.stereotype.Component;
import org.springframework.web.servlet.HandlerInterceptor;

import javax.annotation.Resource;
import javax.servlet.http.HttpServletRequest;
import javax.servlet.http.HttpServletResponse;

/**
 * jwt拦截器
 */
@Component
public class JwtInterceptor implements HandlerInterceptor {

    private static final Logger log = LoggerFactory.getLogger(JwtInterceptor.class);

    @Resource
    private AdminService adminService;

    @Override
    public boolean preHandle(HttpServletRequest request, HttpServletResponse response, Object handler) {
        // 1. 从http请求的header中获取token
        String token = request.getHeader("token");
        if (StrUtil.isBlank(token)) {
            // 如果没拿到,我再去参数里面拿一波试试  /api/admin?token=xxxxx
            token = request.getParameter("token");
        }
        // 2. 开始执行认证
        if (StrUtil.isBlank(token)) {
            throw new CustomException("无token,请重新登录");
        }
        // 获取 token 中的userId
        String userId;
        Admin admin;
        try {
            userId = JWT.decode(token).getAudience().get(0);
            // 根据token中的userid查询数据库
            admin = adminService.findById(Integer.parseInt(userId));
        } catch (Exception e) {
            String errMsg = "token验证失败,请重新登录";
            log.error(errMsg + ", token=" + token, e);
            throw new CustomException(errMsg);
        }
        if (admin == null) {
            throw new CustomException("用户不存在,请重新登录");
        }
        try {
            // 用户密码加签验证 token
            JWTVerifier jwtVerifier = JWT.require(Algorithm.HMAC256(admin.getPassword())).build();
            jwtVerifier.verify(token); // 验证token
        } catch (JWTVerificationException e) {
            throw new CustomException("token验证失败,请重新登录");
        }
        return true;
    }
}
如何生效?在webConfig里添加拦截器规则:
@Resource
private JwtInterceptor jwtInterceptor;

// 加自定义拦截器JwtInterceptor,设置拦截规则
@Override
public void addInterceptors(InterceptorRegistry registry) {
    registry.addInterceptor(jwtInterceptor).addPathPatterns("/api/**")
            .excludePathPatterns("/api/admin/login")
            .excludePathPatterns("/api/admin/register");
}
- CorsConfig.java
设置自定义头
import org.springframework.context.annotation.Bean;
import org.springframework.context.annotation.Configuration;
import org.springframework.web.cors.CorsConfiguration;
import org.springframework.web.cors.UrlBasedCorsConfigurationSource;
import org.springframework.web.filter.CorsFilter;

@Configuration
public class CorsConfig {

    @Bean
    public CorsFilter corsFilter() {
        UrlBasedCorsConfigurationSource source = new UrlBasedCorsConfigurationSource();
        CorsConfiguration corsConfiguration = new CorsConfiguration();
        corsConfiguration.addAllowedOrigin("*"); // 1 设置访问源地址
        corsConfiguration.addAllowedHeader("*"); // 2 设置访问源请求头
        corsConfiguration.addAllowedMethod("*"); // 3 设置访问源请求方法
        source.registerCorsConfiguration("/**", corsConfiguration); // 4 对接口配置跨域设置
        return new CorsFilter(source);
    }
}
文件上传和下载功能
图书信息管理的增删改查
- 创建数据库表
CREATE TABLE `book` (
  `id` int(10) NOT NULL AUTO_INCREMENT COMMENT '主键ID',
  `name` varchar(255) CHARACTER SET utf8mb4 COLLATE utf8mb4_unicode_ci DEFAULT NULL COMMENT '图书名称',
  `price` varchar(255) CHARACTER SET utf8mb4 COLLATE utf8mb4_unicode_ci DEFAULT NULL COMMENT '图书价格',
  `author` varchar(255) CHARACTER SET utf8mb4 COLLATE utf8mb4_unicode_ci DEFAULT NULL COMMENT '图书作者',
  `press` varchar(255) CHARACTER SET utf8mb4 COLLATE utf8mb4_unicode_ci DEFAULT NULL COMMENT '图书出版社',
  `img` varchar(255) CHARACTER SET utf8mb4 COLLATE utf8mb4_unicode_ci DEFAULT NULL COMMENT '图书封面',
  PRIMARY KEY (`id`)
) ENGINE=InnoDB DEFAULT CHARSET=utf8mb4 COLLATE=utf8mb4_unicode_ci;
- 创建实体类Book.java
@Table(name = "book")
public class Book {

    @Id
    @GeneratedValue(strategy = GenerationType.IDENTITY)
    private Integer id;

    @Column(name = "name")
    private String name;
    @Column(name = "price")
    private String price;
    @Column(name = "author")
    private String author;
    @Column(name = "press")
    private String press;
    @Column(name = "img")
    private String img;
}
- BookDao.java BookMapper.xml
import com.example.entity.Book;
import com.example.entity.Params;
import org.apache.ibatis.annotations.Param;
import org.springframework.stereotype.Repository;
import tk.mybatis.mapper.common.Mapper;

import java.util.List;


@Repository
public interface BookDao extends Mapper<Book> {

    List<Book> findBySearch(@Param("params") Params params);
}
<?xml version="1.0" encoding="UTF-8"?>
<!DOCTYPE mapper PUBLIC "-//mybatis.org//DTD Mapper 3.0//EN" "http://mybatis.org/dtd/mybatis-3-mapper.dtd">
<mapper namespace="com.example.dao.BookDao">

   <select id="findBySearch" resultType="com.example.entity.Book">
        select * from book
        <where>
            <if test="params != null and params.name != null and params.name != ''">
                and name like concat('%', #{ params.name }, '%')
            </if>
            <if test="params != null and params.author != null and params.author != ''">
                and author like concat('%', #{ params.author }, '%')
            </if>
        </where>
    </select>

</mapper>
- BookService.java
import com.example.dao.BookDao;
import com.example.entity.Book;
import com.example.entity.Params;
import com.github.pagehelper.PageHelper;
import com.github.pagehelper.PageInfo;
import org.springframework.stereotype.Service;

import javax.annotation.Resource;
import java.util.List;


@Service
public class BookService {

    @Resource
    private BookDao bookDao;


    public PageInfo<Book> findBySearch(Params params) {
        // 开启分页查询
        PageHelper.startPage(params.getPageNum(), params.getPageSize());
        // 接下来的查询会自动按照当前开启的分页设置来查询
        List<Book> list = bookDao.findBySearch(params);
        return PageInfo.of(list);
    }

    public void add(Book book) {
        bookDao.insertSelective(book);
    }

    public void update(Book book) {
        bookDao.updateByPrimaryKeySelective(book);
    }

    public void delete(Integer id) {
        bookDao.deleteByPrimaryKey(id);
    }
}
- BookController.java
import com.example.common.Result;
import com.example.entity.Book;
import com.example.entity.Params;
import com.example.service.BookService;
import com.github.pagehelper.PageInfo;
import org.springframework.web.bind.annotation.*;

import javax.annotation.Resource;


@CrossOrigin
@RestController
@RequestMapping("/book")
public class BookController {

    @Resource
    private BookService bookService;

    @GetMapping("/search")
    public Result findBySearch(Params params) {
        PageInfo<Book> info = bookService.findBySearch(params);
        return Result.success(info);
    }

    @PostMapping
    public Result save(@RequestBody Book book) {
        if (book.getId() == null) {
            bookService.add(book);
        } else {
            bookService.update(book);
        }
        return Result.success();
    }

    @DeleteMapping("/{id}")
    public Result delete(@PathVariable Integer id) {
        bookService.delete(id);
        return Result.success();
    }

}
图书封面文件上传
- FileController.java
package com.example.controller;

import cn.hutool.core.io.FileUtil;
import cn.hutool.core.util.StrUtil;
import com.example.common.Result;
import org.springframework.web.bind.annotation.*;
import org.springframework.web.multipart.MultipartFile;

import javax.servlet.http.HttpServletResponse;
import java.io.OutputStream;
import java.net.URLEncoder;
import java.util.List;

/**
 *  文件上传接口
 */
@RestController
@RequestMapping("/files")
public class FileController {

    // 文件上传存储路径
    private static final String filePath = System.getProperty("user.dir") + "/file/";

    /**
     * 文件上传
     */
    @PostMapping("/upload")
    public Result upload(MultipartFile file) {
        synchronized (FileController.class) {
            String flag = System.currentTimeMillis() + "";
            String fileName = file.getOriginalFilename();
            try {
                if (!FileUtil.isDirectory(filePath)) {
                    FileUtil.mkdir(filePath);
                }
                // 文件存储形式:时间戳-文件名
                FileUtil.writeBytes(file.getBytes(), filePath + flag + "-" + fileName);
                System.out.println(fileName + "--上传成功");
                Thread.sleep(1L);
            } catch (Exception e) {
                System.err.println(fileName + "--文件上传失败");
            }
            return Result.success(flag);
        }
    }


    /**
     * 获取文件
     */
    @GetMapping("/{flag}")
    public void avatarPath(@PathVariable String flag, HttpServletResponse response) {
        if (!FileUtil.isDirectory(filePath)) {
            FileUtil.mkdir(filePath);
        }
        OutputStream os;
        List<String> fileNames = FileUtil.listFileNames(filePath);
        String avatar = fileNames.stream().filter(name -> name.contains(flag)).findAny().orElse("");
        try {
            if (StrUtil.isNotEmpty(avatar)) {
                response.addHeader("Content-Disposition", "attachment;filename=" + URLEncoder.encode(avatar, "UTF-8"));
                response.setContentType("application/octet-stream");
                byte[] bytes = FileUtil.readBytes(filePath + avatar);
                os = response.getOutputStream();
                os.write(bytes);
                os.flush();
                os.close();
            }
        } catch (Exception e) {
            System.out.println("文件下载失败");
        }
    }

}
- 上传下载接口不能拦截,需要放行
// 加自定义拦截器JwtInterceptor,设置拦截规则
@Override
public void addInterceptors(InterceptorRegistry registry) {
    registry.addInterceptor(jwtInterceptor).addPathPatterns("/api/**")
            .excludePathPatterns("/api/files/**")
            .excludePathPatterns("/api/admin/login")
            .excludePathPatterns("/api/admin/register");
}
- BookView.vue
el-upload:https://element.eleme.cn/#/zh-CN/component/upload
<el-form-item label="图书封面" label-width="20%">
  <el-upload action="http://localhost:8080/api/files/upload" :on-success="successUpload">
    <el-button size="small" type="primary">点击上传</el-button>
  </el-upload>
</el-form-item>
successUpload(res) {
  this.form.img = res.data;
},
图书封面预览、下载
el-image:https://element.eleme.cn/#/zh-CN/component/image
<el-table-column label="图书封面">
  <template v-slot="scope">
    <el-image
        style="width: 70px; height: 70px; border-radius: 50%"
        :src="'http://localhost:8080/api/files/' + scope.row.img"
        :preview-src-list="['http://localhost:8080/api/files/' + scope.row.img]">
    </el-image>
  </template>
</el-table-column>

<el-button type="primary" @click="down(scope.row.img)">下载</el-button>
down(flag) {
  location.href = 'http://localhost:8080/api/files/' + flag
}
速实现简单实用的角色和权限控制
快速实现模块之间的关联
快速实现提交审核等功能
快速实现预约、预定等的功能
快速实现文件上传和下载功能
快速实现批量导入和导出功能
快速实现批量删除功能
快速实现留言、讨论回复等功能
快速实现富文本发帖看帖回复功能
快速实现集成地图的功能
未完待续,持续更新……
- 感谢你赐予我前进的力量

